Friday 30 November 2007

My Montessori corner of the world...

I have had a lot of emails recently, thank you to everyone who is reading and your kind words, I appreciate every mail and comment you send.
Some of the questions asked has led me to photo our Montessori set-up, since we have moved we have more space which makes things easier, but not THAT much more space. Most of the equipment is in the spare room which is also the Montessori room and the hobby room - has to work hard that poor room!
This is the Montessori corner


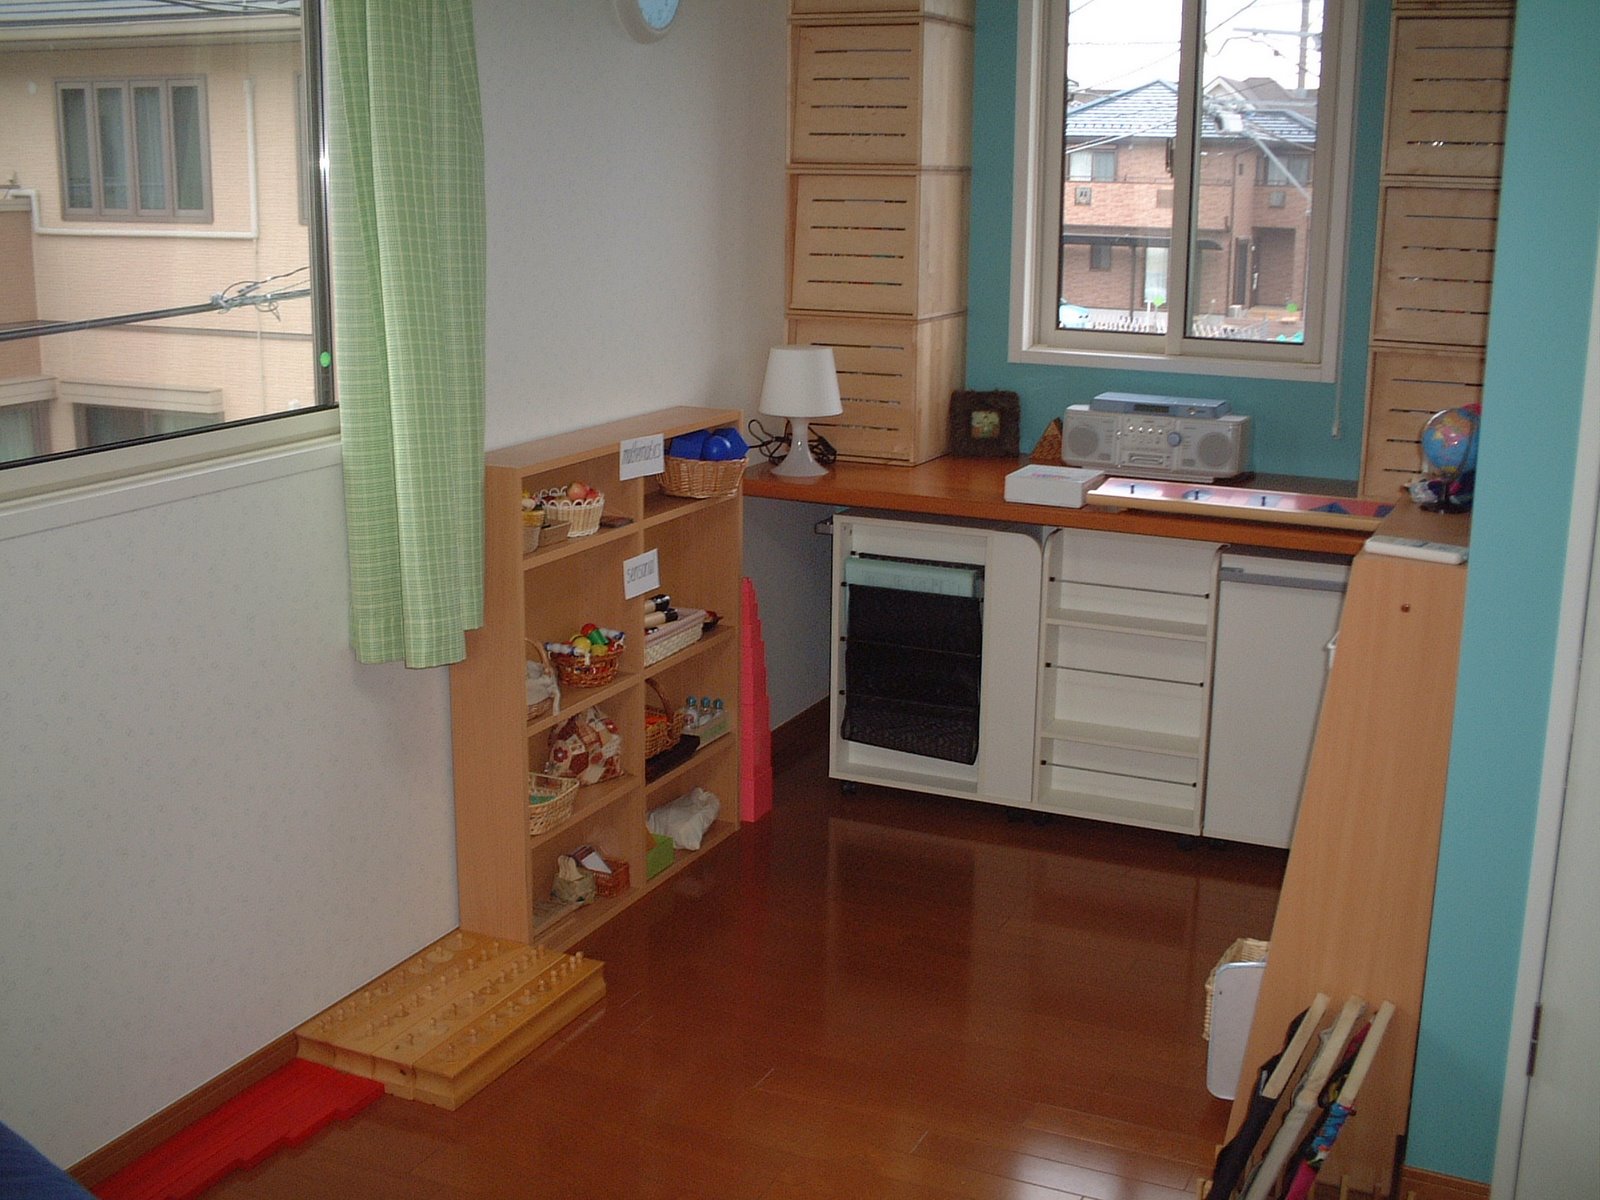
the shelves are actually for CDs so they are actually quite narrow, the white draws under the desk are on casters and have different storage systems on each side so I will use these too as I collect more equipment. I also have the metal insets set up on the desk, I only have 5 shapes out and swap them around with the others to save a bit of space.

Shelf One - has a few Mathematics things and Sensorial items, if you want to know exactly what everything is on the shelves check the Flickr picture, if you roll your mouse over the picture you can see the notes that I have added.


Shelf Two - has a couple of practical life exercises, most of the PL things are downstairs, science and culture, I am still working on this bit and the language section. Again, if you want to know exactly what everything is on the shelves check the Flickr shelf 2 picture.

Here is the small table and stool we use for work upstairs, although BabyEbi prefers to work on a mat on the floor except for the metal insets exercise.


This is the small shelf in the kitchen, the top shelf is kept for snack preperation, the lower shelves for practical life which I try to rotate often. He also has his apron, bib (for dinner time) and brush and pan here. We havent had chance to sort out the pantry yet but when we do I will have a section for his cleaning things. The 100yen shop is a great place to find mini versions of things, brush and pan; floor sweeper; buckets etc. If you want to know exactly what everything is on the shelves check the kitchen shelf picture on Flickr


This is a Ikea small table and chair, he uses this for snack time, to do crafts, PL activites such as pouring or spooning and drawing. It also comes in handy as a side table for adults when a little boy has gone to bed!


When we had the house built we had the light switch in his bedroom placed lower so he can already reach it, we have a small step in each toilet and at the sink so he can go to the toilet by himself and wash his hands. In the living room we have a small shelf with a selection of books and a few toys, these get rotated too. Sometimes he will want to play downstairs so I will bring his Lego box or train set down if that is what he wants to play with. I dont know if Maria Montessori would approve of lego but I personally thing it is a great toy and BabyEbi loves his, in fact I believe Santa will bring him some for Christmas, we wanted to get him the Dino set, it turns out it is classed as educational lego so we had to ordered from a specialised education shop, not even the Lego shop stocked it!
His closet is all set up so he can easiely take out and put away his clothes and he can reach all his toys on the shelves, he also has some more shelves at the end of his bed with books and his train set. I think that sums it all up, hope this answers any questions, feel free to ask more and if you are a more experienced Montessorian and have any advice, that would be lovely too.

Monday 26 November 2007

sound cylinders tutorial

Wow, it has been a week since I posted last, a busy week of making Christmas presents that I really need to send by the end of the week, I have a couple more to do but my sewing machine is having one of her "turns" so progress is slow, maybe she is sulking because she heard a rumour that Mr Ebi will buy me an up-graded model for my birthday *grin*
This morning I managed to make some sound cylinders for BabyEbi


They are not as beautiful as the expensive wooden ones you can buy but they work just as well. 
I basically took some card tubes and filled pairs with different fillings. Dried beans, rice etc. Then taped up the ends with duct tape. Make sure each pair had a red and a blue end.

PRESENTATION:

1. Take the box/basket of sound cylinders to the rug and put it on the middle of the rug. (Can be done at the table too)

2. Take out all cylinders and line them beside the basket, place all the blue together and all the red together then explain to the child what you are going to do.

3. Pick up one blue cylinder this will act as the control, shake it once, close to the ear (do not shake it like a maraca), listen to the sound then let the child listen to it.

4. Take one cylinder from the red line and shake the cylinder to see if it is the same sound as the control one. Let the child listen to the sound and ask the child if they are the same or not.
If it is the same but the pair together in front of the basket/box.

5. If they are not the same but the red cylinder back and repeat step 4 until you find a matching pair. Continue doing the same activity until all the cylinders are matched.

6. Mix them and let the child do it.

7. Once the activity is complete, replace the cylinders into the box/basket and take them back to the shelf, tell the child that he/she can now work with the cylinders whenever they like.

The direct aim of the exercise is auditory discrimination of sound, indirectly it is preparing the child for music.

The exercise can be made more difficult with the introduction of more cylinders and then grading them from quiet to loud.


Click the image below to get free access to the jojoebi resource library


Tuesday 20 November 2007

cylinder blocks

Babyebi got his cylinder blocks out yesterday, usually he works with 2 blocks, he has once got 3 blocks out but got bored half way through but yesterday he got all FOUR blocks out.
I helped his lay them out in a square then he sat and did the whole exercise by himself, I love catching him when he is in that deep concentration phase. He has actually started looking into the holes to see how deep they are instead of just dropping the cylinder in and hoping for the best. I must admit, I was surprised that he stuck at it and did them all, he did have to take a couple of minutes time out, to jump up and down on the sofa but then he returned to his work.
Taking all the cylinders out


Trying to find a cylinder to match the hole.


Just look at the concentration on his face!


Putting everything away

Friday 16 November 2007

blood, phlem and dinosaurs

It has been a crappy couple of days, BabyEbi had one of his nose bleed sessions, it just starts for no apparent reason, he doesn't have to even touch his nose, it just starts pouring. Then Mr Ebi came home, he has had a bad case of "man flu" for the last couple of weeks, hasn't been able to shift the cough and the medicine the doc gave him just wasn't working. Finally 4th visit to the doctors and they announce he has mild pneumonia and give him some stronger medicine. At least this last lot seems to be working, it knocks him out at night so he (and I) have finally managed to get some sleep. Then just to top it all off Babyebi had problems at "the other end" appears to be a bit bunged up so last night he was in a lot of pain and spent a good two hours running to and from the toilet.
I felt really sorry for him since the weather has been lovely for the last 3 days and he hasn't been able to spend as much time outside as usual so last night when the Ebi boys had gone to bed I made a little spotty dinosaur (by hand because the bloody stupid sewing machine is also having one of her turns grrrr) and left it on BabyEbi's little bed shelf so that he would find it when he woke up. he was so excited this morning, he hasn't put it down yet, even had to go to the loo with him - lovely!

Wednesday 14 November 2007

One Hundred Posts Awards & downloads


A while back Meg kindly gave me a blog award, it has taken me a while to get round to compiling my own award list and so, in no particular order, here are the jojoebi pure inspiration blog awards...

The Inspiational Senpei Award goes to Lindart for all her advice and encouragment over the last few months.

The Inspired Montessori Motivator Award goes to Meg of Montessori by Hand for constantly coming up with beautiful projects and ideas.

The Graphics Inspiration award goes to print & pattern who posts a wonderful array of new graphic designs from all over the world.

The Crafty Inspiring Orange Award goes to How about orange... who not only has a great taste in colour (yep, orange is my favourite too) but she also posts great links for projects and tutorials.

The Wonderful Personal Inspiration award goes to Kathy at Mikan Days, a truely remarkable lady. A mother of 4 who is battling cancer who shows such strength by writing about her life, if I am having a bad day I think of Kathy and it puts everything back into perspective.

To celebrate 100 posts I have put up the Montessori 3 part cards that I have made, just follow the instructions....

OK, go over to my flickr you should see a set called "3 part cards" on the right-hand-side, click on it. It will open a new page, click on the 3 part cards icon again.

Click on one of the pictures, to the right there is a link in blue "different sizes" click on the link

Above the picture it should say "download the medium size" you could use this but for better quality pictures click on the "original" size and then download it. (repeat for other files)

You should have the jpg file on you computer to print out as you like.....fingers crossed.

Saturday 10 November 2007

Memory Books - Great Christmas presents!!


Last year I made one of these memory books for my grandmother or "Mother Cock" as she is fondly known - No, it isn't a rude nickname, it a shortened version of her surname!! Anyway, everyone thought it was a great idea so after some feedback from Mother Cock I made some commercial versions.

The idea is to give it to your grandparent or your childs grandparent for them to fill and keep, the book will get passed down to it's rightful owner when the grandparent in question passes away.

There are lots of things I don't know about my own grandparents lives, where grandad proposed, where they went to school, what was their favourite school subject/sport/food etc. Their grandparents names, important people who have featured in their lives, the list goes on. So the books are brimming with questions from the trivial to the deep and meaningful.

Got questions you want to ask yourself, no problem, I left pages at the back just for that purpose, there are also blank pages for photos and places for pearls of wisdom.

Mother Cock complained that the font I had used in her book was "too fancy" so I changed it to a clear, easy to read, no messing type of font, made the writing and book size bigger too.

Twinned with a nice pen it is a perfect Christmas or birthday gift and if granny or granpa are not up to doing the writing you can offer to do as they dictate, what a wonderful way to get to know your parents/grandparents better. I seriously wish I had made these earlier since I only have one grandmother left now. So, get over to the shop and get your order in!!

Friday 9 November 2007

sink Vs float and the balance game

We had a busy morning today, I gave BabyEbi a presentation of the float and sink exercise, I wasn't sure if he would grasp the concept or not but he did quite well. I don't think he can do it unsupervised yet, I will help him again next time and see how it goes, he seem to understand the difference but then forget which bowl was which. He did enjoy doing it though and repeated the exercise 4 times.


To do the work he half filled a bowl of water, then took an object off the tray and put it in the bowl, if it floated he would then dry it and put it in the 'float' boat (use labels to help) and if it sank he would put it in the 'sink' bowl.


He then got out his balance game, I bought this at Muji quite a while ago but he is only just getting the concept. The players take it in turns rolling the dice, you have to pick up a cylinder of the right colour and place it on the "moon" shaped block, keep taking it in turns trying not to knock the rest of the cylinders off. BabyEbi used to ge upset when it collapsed but now he just thinks it is funny. He also added some of his own rules, once all (or most) of the cylinders are on the moon shape, you roll the dice and take that colour off the moon then use the cylinder to build a tower - which usually falls over after 4 or 5 pieces, more laughter!!

Thursday 8 November 2007

stomp, stomp, roar, roar

here come the dinosaurs!


Since discovering dinosaurs in the local park, BabyEbi has become a bit obsessed so I decided to make him some dino 3 part cards and of course a wallet to hold them in....(no, that isn't a kangaroo on the front, it is supposed to be a Parasaurolophus!


With the wallets I made for the art and fruit cards I found that babyEbi (and erm, myself too) would sometimes pick up the wallet upside down and then all the cards would fall out, so this time I made a flap to cover the cards and hopefully hold them in....


I made a set of cards with just the picture, a set with the picture and name, a set of name cards and a set on info cards. I used the clipart from learning page , you have to sign up to access a lot of the file but it is free and there is some great stuff on there.
Although the ribbon ties I have used on other wallets look very pretty, babyEbi can't do and undo them by himself yet, so I used a dino button and an elastic hook so he can open and close it without my help.


Right, I am not sure if this is going to work, it seems to on my computer but if someone could try it out and leave a comment to say if it works or not, that would be lovely. *NOTE* - system does work :o)

OK, go over to my flickr you should see a set called "3 part cards" on the right-hand-side, click on it, you can then click on the 3 part cards icon again or the dino cards icon.

Click on one of the pictures, to the right there is a link in blue "different sizes" click on the link

Above the picture it should say "download the medium size" you could use this but you will get a BETTER quality image if you click on the "original" size - near the top of the page and then download it. (repeat for other files)

You should have the jpg file on you computer to print out as you like.....fingers crossed.

Tuesday 6 November 2007

another rainy day - soft tree project

I stumbled across soft trees flickr group
the other day and thought, what a nice idea. So when we got up today and realised it was going to be an indoors day I thought
we would have a go at making one. I found some green fabric and cut a circle out of it then a cone shape, making sure that the bottom edge of the cone was slightly longer than the circumference of the circle. Cut it out, sewed up the edge then sewed the circle to the bottom edge, leaving a gap to turn it the right side out. Is this making sense?
BabyEbi then helped me stuff it then as he had his snack I sewed up the hole that was left for the stuffing and dug out some suitable bits to decorate the tree with...a beautiful result, I think - but then I am biased!


Friday 2 November 2007

Christmas traditions

I know, it's not even November yet, never mind December. I usually have to start my Christmas shopping early due to having send most of my presents half way round the world, it never seems right somehow, I like to wait until December to start the Christmas festivities proper. Anyway, I was having a mooch on esty and came across this beautiful hand blown glass decoration byRebecca Zhukov

I fell in love with it and have a perfectly good reason to buy it, you see, when BabyEbi was born I decided to buy him a hand blown tree decoration each year and present them to him when he comes of age (20 in Japan). He will then have a beautiful collection of decorations - or I will "look after" them and he can have them when I pop my clogs!!
Pin It button on image hover